Using SQLite and Sequelize with ActionHero
This past weekend I was checking out ActionHero, a pretty nice API framework written in Node.js which claims to be: "Reusable,
Scalable, and Quick!" I was setting up a quick example and I didn't want to have to connect to a MySQL or Postgres DB. ActionHero comes with fakeredis,
an in-memory pseudo-redis store, which is great for experimenting but I wanted to use a local disk store. A few google searches didn't turn up too much on
how to use SQLite with ActionHero, so here we go.
pre-req's:
- Node.js (v0.10.x)
- SQLite
- If you like to GUI, A SQLite GUI (such as SQLite Browser)
Install ActionHero
$ npm install -g actionhero
Create a new project
$ cd ~ && mkdir meatr && cd $_ && actionhero generate
This will scaffold a new ActionHero project. At this point you can run npm start and you can visit http://localhost:8080 to see some
basic info about your ActionHero API.
Add dependencies
Next, we will need to add some dependencies to our project. We are going to install sqlite3 for SQLite support and Sequelize which is an ORM designed to abstract away your DB boilerplate code. Sequelize works with SQLite, MySQL and Postgres as of this writing. For quick prototyping
it might be worth starting with a small/local store like SQLite and then moving to MySQL or Postgres when you have to start thinking about scaling / performance
issues. Also there are some features that MySQL and Postgres include that SQLite won't (and can't) ever support.
$ npm install --save sqlite3 sequelize
Create a config
Although we're just going to be using a simple SQLite flat-file database, let's make a configuration for any parameters we'll need to send along.
// config/sqlite.js
module.exports.default = {
    sqlite : function(api) {
        return {
            storage: __dirname + '/../store/app.sqlite',
            dialect: 'sqlite'
        };
    }
};
All we are doing here is attaching a new function to ActionHero's default configuration. The function gets injected with the root ActionHero object api,
but we don't really need to worry about that here. We simply return an object with two keys: storage & dialect. storage will tell Sequelize where the file store is located. dialect informs Sequelize what type of store we are using, in this case it's a SQLite file
store. If you were going to use MySQL or Postgres, you could include other configuration properties here such as username,password,port,hostname,
etc.
Let's initialize!
ActionHero has the concept of Initializers which bootstrap configurations before
the API initially starts. We need to expose an API to setup our data store. ActionHero provides a handy command line interface to scaffold certain elements of
the project.
$ actionhero generateInitializer --name="sqlite"
info: actionhero >> generateInitializer
info:  - wrote file 'C:\Users\cnajewicz\Documents\meatr\initializers\sqlite.js'
This creates a new file at initializers/sqlite.js with some stubbed methods:
// initializers/sqlite.js
exports.sqlite = function(api, next){

  api.sqlite = {};

  api.sqlite._start = function(api, next){
    next();
  };

  api.sqlite._stop =  function(api, next){
    next();
  };

  next();
}
Our module here exports a function which is injected with the root ActionHero object api and a callback function, next. If you've
never used frameworks like express.js, the next callback is used to progress through the next "task" on the stack to run.
If you are doing anything asynchronus, make sure not to execute next until your promise is resolved or rejected.
ActionHero has several pre-defined hooks: _start and _stop run exactly when you think they would. We'll be focusing on the _start method to setup our data store and models. We'll be creating a new instance of Sequelize, so we'll import the module.
// initializers/sqlite.js
var Sequelize = require('sequelize');

exports.sqlite = function(api, next){

  api.sqlite = {};

  api.sqlite._start = function(api, next){
    next();
  };

  api.sqlite._stop =  function(api, next){
    next();
  };

  next();
}
Wait, models?
Right, the cool thing about Sequelize is that it abstracts creating your tables away from you, making it easy to define your models in one place and not necessarily
have to worry about your table naming etc. Let's create our Meat model file:
$ mkdir models && cd $_ && touch Meat.js
// models/Meat.js
module.exports = function(sequelize, DataTypes) {
  return sequelize.define('Meat', {
    id: {
      type: DataTypes.INTEGER,
      primaryKey: true,
      autoIncrement: true
    },
    name: DataTypes.STRING,
    tastes_like: DataTypes.STRING,
    is_tasty: DataTypes.BOOLEAN
  });
};
Later when we actually import our "Meat" module, it gets injected by Sequelize with our Sequelize object and a shortcut to an enum DataTypes.
You can read about Sequelize data types on their official documentation. We're
using the define method here which takes a string description of your model in the singular and then an attributes hash which will map to columns
in the data store.
...and we're back (to Initializers)
Back to our sqlite initializer (initializers/sqlite.js), we need to create a new instance of Sequelize,
and also create a models collection (api.models), and use the import method of our Sequelize instance sqlized.
// initializers/sqlite.js
var Sequelize = require('sequelize');

exports.sqlite = function(api, next) {

  // omitting database name, username and password as it's not required
  var sqlized = new Sequelize(null,null,null,api.config.sqlite);

  api.models = {
    Meat: sqlized.import(__dirname + '/../models/Meat.js')
  };

  api.sqlite = {};

  api.sqlite._start = function(api, next){
    next();
  };

  api.sqlite._stop =  function(api, next){
    next();
  };

  next();
};
Later, when we need to perform CRUD operations on our Meat models, we've stored a reference in api.models.
Sync the schema
You may have noticed that all we've done with our actual SQLite store is simply create the file. It's time to syncronize our models with the SQLite store
and create any necessary schema. Sequelize makes this simple with the sync method. sync returns a Promise, so we'll provide two
functions (succes, error) to then.
   api.sqlite._start = function(api, next) {
        api.models = {
            Meat: sqlized.import(__dirname + '/../models/Meat.js')
        };

        sqlized
            .sync()
            .then(syncSuccess, syncError);

        function syncSuccess() {
            api.log('Succesfully synced DB!');
            next();
        }

        function syncError(ex) {
            api.log('Error while executing DB sync: '+ ex.message, 'error');
            process.exit();
        }
    };
Do it doug!
Let's start this thing up and see what happens.
$ npm start
In a flurry of activity, you should see a bunch of logs flow down your screen. Some items to make a note of:
2014-07-14 5:16:44 - info: running custom initializer: sqlite
2014-07-14 5:16:44 - info: Succesfully synced DB!
2014-07-14 5:16:44 - debug:  > start: sqlite
At this point you should be able to open up store/app.sqlite and see our Meat schema which has been automagically created by Sequelize. Hit CTRL-C to quite our server process.
Actions
We have succesfully created a SQLite store for our Meat schema, but we have no way of getting data into it via the API. Let's quickly create an ActionHero
action to expose an API endpoint which we can POST to create some meat!
// actions/meat.js
exports.meatAdd = {
  name: 'meatAdd',
  description: 'Add a new meat!',
  blockedConnectionTypes: [],
  outputExample: {},
  matchExtensionMimeType: false,
  version: 1.0,
  toDocument: true,

  inputs: {
    required: ['name'],
    optional: ['is_tasty', 'tastes_like'],
  },

  run: function(api, connection, next) {

    var new_meat = {
      name: connection.params.name,
      is_tasty: !!connection.params.is_tasty,
      tastes_like: connection.params.tastes_like || null
    };

    api.models.Meat
      .create(new_meat)
      .then(createSuccess, createError)
      .finally(function() {
        next(connection, true);
      });

    function createSuccess(created_meat) {
        connection.response.meat = created_meat;
    }

    function createError(err) {
        api.log('Could not create new meat named: ' + new_meat.name, 'error');
        connection.error = err;
    }
  }
};
Try it out
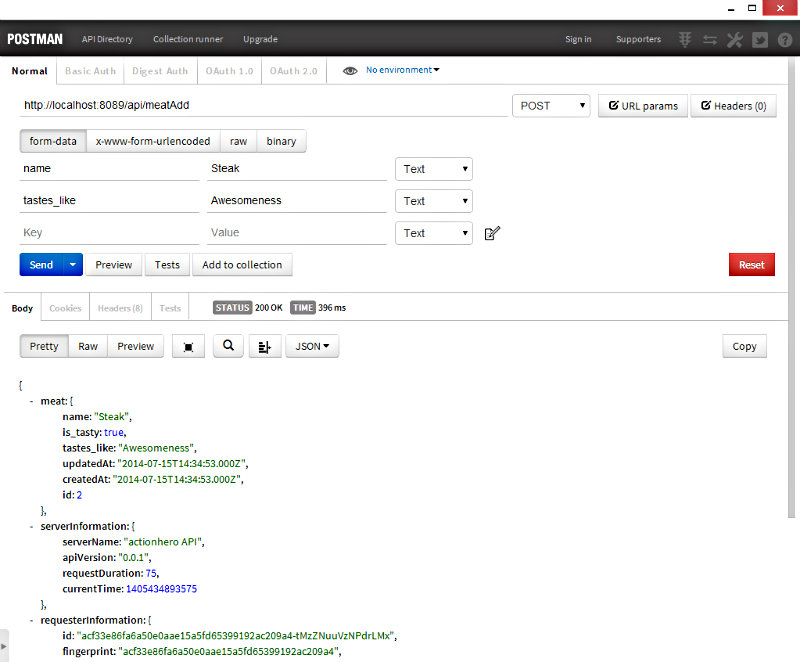
After saving actions/meat.js, start ActionHero up again by issuing npm start. Using a utility (I used POSTman, you can use cURL etc.),
send a POST to http://localhost:8080/api/meatAdd and add some meat!
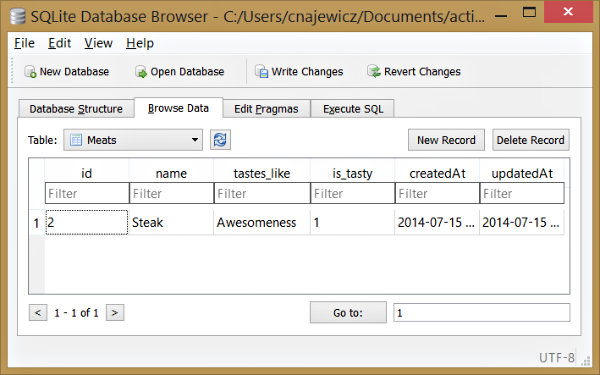
Open up your favorite SQLite GUI and verify the record was stored:
Up next, we'll create an EmberJS based UI for our meat app.
I've included the source for this project on GitHub.